TimberTech PRO vs Vintage: Which Makes the Better Deck?
Compare TimberTech Pro vs Vintage decking collections to find the best option for your outdoor space. Learn about durability, style, pricing, and more.
Choosing the right materials for your home improvement projects can be overwhelming, especially when aiming for sustainability, durability, and aesthetic appeal. With innovations like Coconut Husk TimberTech and custom cable railing, homeowners can now achieve an eco-friendly yet stylish design. These materials combine to create functional, modern, and long-lasting outdoor spaces. Let’s explore why these options are increasingly popular and how BB-Builders Pro can help you bring this vision to life.
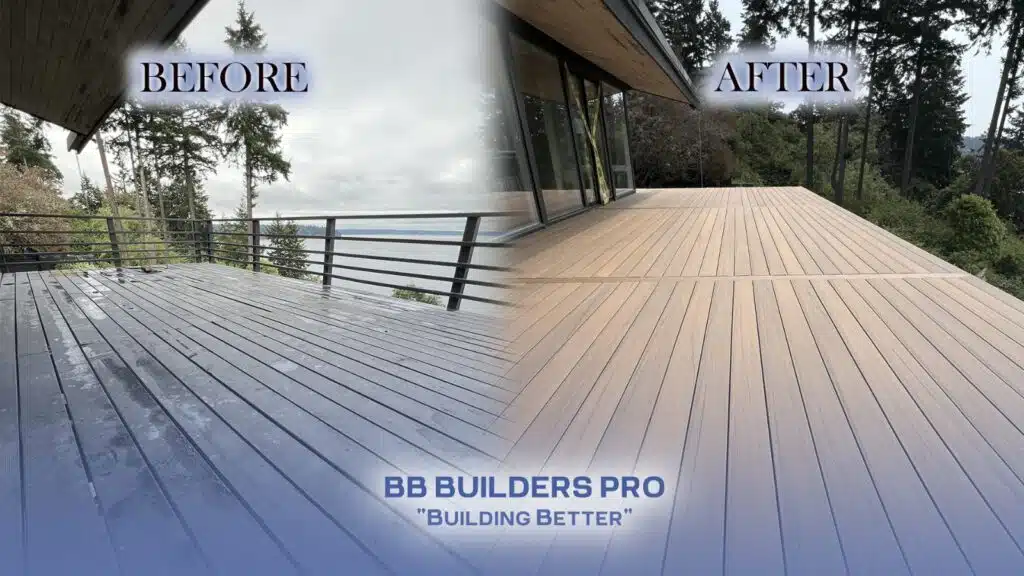
Coconut Husk TimberTech is a groundbreaking decking material that blends recycled coconut husks with durable composite technology. This eco-friendly solution offers the beauty of natural wood without the maintenance and environmental drawbacks. Unlike traditional decking, Coconut Husk TimberTech is resistant to rot, splintering, and fading, making it a perfect choice for long-lasting outdoor spaces.
In addition to its durability, Coconut Husk TimberTech is sustainable. By repurposing coconut husks, a byproduct of the coconut industry, this material reduces waste and minimizes its environmental footprint. With Coconut Husk TimberTech, homeowners can enjoy a premium decking solution that’s both beautiful and planet-friendly.
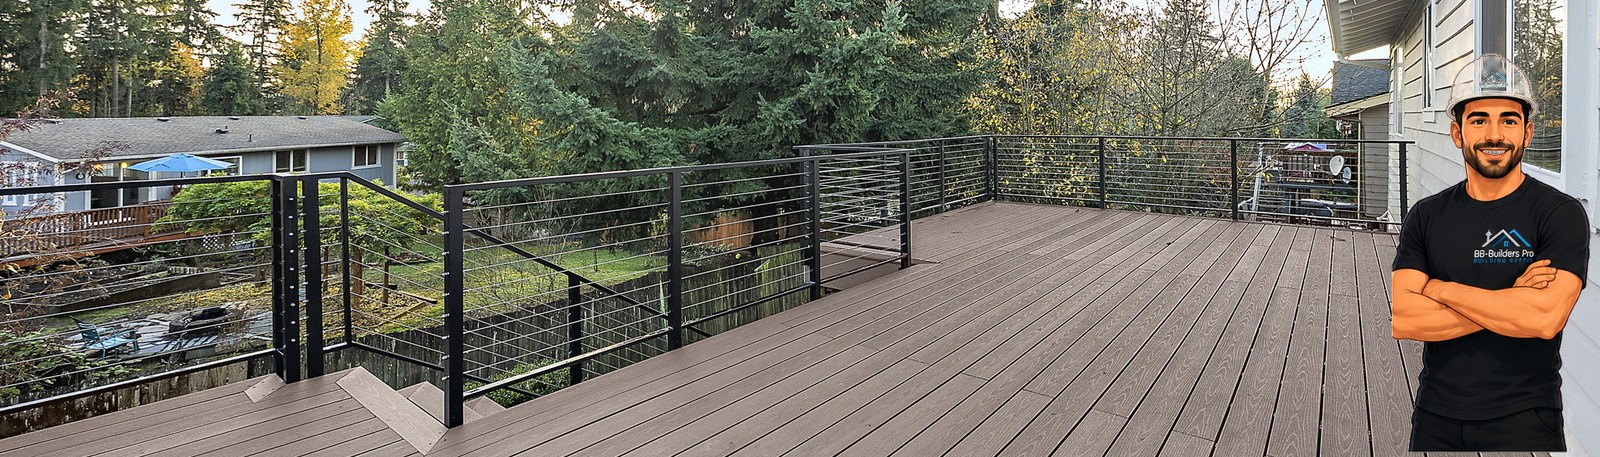
When paired with custom cable railing, Coconut Husk TimberTech truly stands out. Cable railings are sleek, modern, and versatile, offering unobstructed views while ensuring safety. They complement the natural tones of Coconut Husk TimberTech, creating a seamless and contemporary look for decks, patios, and balconies.
Custom cable railing is not just about aesthetics; it’s also about personalization. With options to match your home’s style, these railings allow homeowners to choose the perfect design and finish. Whether you prefer a minimalist stainless-steel look or powder-coated finishes, BB-Builders Pro can craft a solution that enhances your outdoor space.
One of the standout features of Coconut Husk TimberTech and custom cable railing is their durability. Engineers engineered Coconut Husk TimberTech to withstand harsh weather conditions, making it ideal for any climate. Its composite nature ensures that your deck resists moisture, insects, and UV damage, offering years of worry-free use.
Similarly, high-quality materials like stainless steel and marine-grade finishes ensure the strength and longevity of custom cable railing. These railings resist corrosion and require minimal maintenance, making them a practical choice for busy homeowners who want beauty without constant upkeep.
Choosing a coconut husk TimberTech reflects a commitment to sustainability. By utilizing renewable materials like coconut husks, this decking reduces the demand for virgin wood, protecting forests and biodiversity. It also incorporates recycled plastics, further reducing its environmental impact.
Custom cable railing also aligns with eco-conscious values. The materials used are recyclable, and their longevity reduces the need for replacements, minimizing waste over time. With BB-Builders Pro, you’re not just investing in premium materials but also contributing to a greener planet.
Homeowners love Coconut Husk TimberTech and custom cable railing for their low-maintenance qualities. Unlike wood decks that require regular sealing, staining, and repairs, coconut husk TimberTech needs only occasional cleaning with soap and water. Its composite construction resists common issues like warping and cracking.
Custom cable railing is equally hassle-free. Designed to withstand the elements, these railings require minimal upkeep to maintain their sleek appearance. With this combination, homeowners can spend more time enjoying their outdoor spaces and less time on maintenance.
When it comes to integrating Coconut Husk TimberTech and custom cable railing into your home, BB-Builders Pro is the name you can trust. Our team of experts specializes in designing and installing premium outdoor solutions tailored to your preferences. We ensure every project reflects the highest standards of craftsmanship and durability.
With years of experience, BB-Builders Pro combines innovative materials with unparalleled expertise. Whether you’re upgrading your deck or creating a brand-new outdoor space, we deliver results that exceed expectations. Let us help you transform your home with sustainable, stylish, and functional designs.
The pairing of Coconut Husk TimberTech and custom cable railing is ideal for homeowners seeking modern, eco-friendly solutions. The natural textures of the decking complement the sleek lines of the railing, creating a harmonious blend of form and function. This combination enhances curb appeal while offering a safe and enjoyable outdoor experience.
Moreover, these materials’ durability and low-maintenance nature make them a wise investment. They not only add value to your property but also provide a sustainable way to enjoy the beauty of nature. With BB-Builders Pro, achieving this perfect combination has never been easier.
Upgrading to Coconut Husk TimberTech and custom cable railing is more than just an aesthetic choice; it’s an investment in your home’s future. The design of these materials ensures durability and minimal environmental impact. They enhance your outdoor spaces, making them more enjoyable and functional for years to come.
Partnering with BB-Builders Pro guarantees the flawless execution of your vision. From initial consultation to final installation, we prioritize quality, sustainability, and customer satisfaction. Choose Coconut Husk TimberTech and custom cable railing for a home that’s as beautiful as it is responsible.
Compare TimberTech Pro vs Vintage decking collections to find the best option for your outdoor space. Learn about durability, style, pricing, and more.
TimberTech is an excellent choice for decking material. But how much does a TimberTech deck cost? An average 20’x20’ installation in Seattle could cost you at least $16,000, factoring in the expenses incurred by the project’s logistics and the city’s bureaucratic requirements. Let’s explore these cost drivers and how you can get the most out of your deck project. Understanding TimberTech Product Lines TimberTech offers durable, low-maintenance PVC boards made from a combination of synthetic materials and fibers from recycled wood. They come in a wide range of aesthetic styles and varying costs. Your choice of decking, then, primarily determines the cost of your deck build. With that in mind, let’s look at the brand’s current product collections and the average prices at which they are sold by suppliers in and around Seattle. For these cost approximates, let’s assume the standard board measurements of 5.5”x7.25”. Vintage Collection Vintage Collection decking is designed to mimic aged hardwood like English walnut, mahogany, and teak. This top-of-the-line collection intends to provide a luxurious appearance to your deck. Standard Vintage Collection boards cost approximately $5.38 to $11.45 per linear foot, or $11.72 to $18.93 per square foot. Landmark Collection Landmark Collection boards are distinguishable by their aesthetically pleasing crosscut cathedral grain style—think organic arching peaks rather than swirls and rings. This style intends to mimic reclaimed wood, giving your deck a rustic feel. Each standard board costs $5.99 to $7.57 per foot, which translates to $13.06 to $16.49 per square foot of the decking surface. Legacy Collection TimberTech Legacy Collection boards are designed to imitate hand-scraped hardwood. The collection prominently features cascading color variations and a low-gloss, wire-brushed finish, giving your deck the impression of an aged hardwood surface. Local suppliers sell standard boards of this line for about $6.44 to $8.48 per foot, or $14.42 to $18.99 per square foot. Harvest Collection Like Landmark Collection decking, Harvest Collection boards feature cathedral grain cuts. The difference here is that the surface mimics stained or painted wood—a perfect choice if you’re going after modern aesthetics or beachside vibes. The cost for Harvest Collection boards ranges from $4.79 to $9.67 per foot, which is $10.50 to $21.35 when converted to square feet. Beyond the Boards: Other Cost Drivers Knowing how much TimberTech boards cost is just the start. Many other factors determine the final cost of your installation, including the following: Deck Size The area your deck covers determines the project’s fundamental costs, mainly the expenses for the materials and labor. The bigger the deck, the more boards and other components are needed, and the longer and more complex the work will take. Indeed, a 20’x20’ deck will definitely cost more than its 15’x16’ counterpart. Design Your deck’s design determines the complexity of the work, which translates to the required work hours and professional services needed. For example, decks with plumbing—perhaps those with outdoor kitchens or baths—may require the services of a licensed plumber, plus more labor hours than is necessary for a plain terrace. Furthermore, your aesthetic choices affects the expenses in terms of material and, to a lesser extent, labor. Labor and Professional Services While you can build your deck by yourself, it’s always best to have some helping hands. You can hire skilled workers in Seattle for $37.29 per hour. Additionally, you will need to employ the services of an architect and a structural engineer to ensure safety and regulatory compliance for your project. Their rates vary according to the scope and complexity of the project. Permits According to Seattle building codes, a deck that stands more than 18 inches above the ground and includes long beams requires a construction permit. This could cost a few hundred dollars, but you only need to pay 75% upfront; the rest can wait until the permit is issued. Additional permits are also needed if the work involves plumbing and electrical installation. Simpler deck projects may not need to apply for a construction permit. However, all constructions will require a Subject-to-Field-Inspection (STFI) Permit to proceed. Site Preparation Preparing the site for construction means clearing and leveling the ground, digging the foundations, and possibly demolishing an existing deck. As you can imagine, this is best done by a team of skilled workers, incurring labor costs that depend on the difficulty of the work. Budgeting Tips For Your TimberTech Deck Project It’s easy to see how a TimberTech deck installation can be an expensive endeavor that can easily skyrocket cost-wise. Your deck-building expenses don’t have to go beyond what you can and are willing to spend. Here are a few tips to ensure it gets an adequate and manageable budget: Conclusion The cost of a TimberTech deck installation goes beyond the price of individual boards. The size and complexity of your deck’s design directly affect the material and labor expenses. Meanwhile, permit fees are non-negotiable, and site inspection and preparation will add to the initial outlay. Understanding these expenses on top of meticulous planning ensures that you’ll get a beautiful yet low-maintenance TimberTech deck built well within your expectations.
Every bathroom remodel is an exciting adventure to improve your Seattle home’s comfort and value. It is a complex project, so it’s essential for you to have everything planned out. Here’s a comprehensive checklist that breaks down the entire process, helping you stay on track and well within your budget. Things to Consider for Your Bathroom Remodel Before we go over the specifics, here’s a quick overview of what you need to get your bathroom remodel in order: With that all said, let’s go through everything that you need to complete your dream bathroom remodel. Bathroom Remodel Checklist A typical bathroom remodel is composed of five phases: conceptualization, planning, preparation, construction, and finalization. This checklist will go through each of these stages and detail all the necessary subtasks in a step-by-step manner. Phase 1: Conceptualizing Your Vision The first stage of your bathroom remodel involves consolidating your ideas for your renovation project. As you can expect, it will involve a lot of thinking and research—practically no more than ideation and setting expectations. This is your project’s foundational phase, and here’s what you need to accomplish: Phase 2: Drawing up Plans Once you’re clear on your bathroom remodel concept, it’s time to go down the literal drawing board. In this stage, you get to define how you get your remodel done. Phase 3: Preparing for the Construction This is the part where you officially start with your remodel. You’re basically laying the groundwork for your remodel, preparing your bathroom and home for the upcoming transformation. Here’s what you’ll need to do in this phase: Phase 4: The Actual Bathroom Remodel Work Now to the fun part: bringing all that prep work together. It’s not easy by any means, but it should not be complicated if you know where to begin. Phase 5: The Final Steps Now that your bathroom remodel is finished, it’s time to tie up some loose ends. Here’s what you need to do to conclude the renovation: Final Thoughts and Summary This checklist should help you confidently navigate the intricacies of a bathroom remodel. By following this guide, you should have a carefully planned and masterfully executed remodel that you will enjoy for years to come.
If you’ve been researching improvements for your humble Seattle home, you might have heard of the term “Jack and Jill bathroom.” What exactly is it, and could it be the perfect solution for your home improvement and your family’s requirements? What Does “Jack and Jill Bathroom” Mean? A Jack and Jill bathroom is a bathroom shared by two bedrooms. Each bedroom is connected to the bathroom by way of a single door. As there is not much space to swing two doors, most Jack and Jill bathrooms use sliding or pocket doors. In terms of layout, the bathroom is usually a single space that contains the vanity, toilet, and shower. There may be one or two vanity sinks, depending on the requirements of the users and availability of space. However, the shower and toilet are almost always shared. A tub may also be present if the square footage permits. So why is it called a “Jack and Jill bathroom,” you ask? It certainly has a lot to do with that familiar children’s rhyme. This type of bathroom is usually shared by two siblings’ bedrooms. That makes them inseparable, just like our favorite ill-fated, hill-climbing water-fetchers, Jack and Jill. Jack and Jill bathrooms are usually found in houses with multiple children. They also feature in homes with guest bedrooms. Builders love this type of bathroom for the fact that they share fixtures and plumbing, minimizing construction costs and saving floor space that would otherwise be used for separate in-bedroom bathrooms. What Is the Difference Between a Jack and Jill Bathroom and a Hollywood Bathroom? Jack and Jill and Hollywood bathrooms are usually confused with each other, but they are distinctly different. As mentioned earlier, Jack and Jill bathrooms house the bath, toilet, and vanity in a single, continuous space. Meanwhile, Hollywood bathrooms are composed of at least two separate rooms—a common area with a double vanity and mirrors, and one or separate partitioned spaces for the toilet and the shower. Additionally, this type of bathroom does not necessarily have to connect to two adjacent rooms. Indeed, the similarities end with the two doors leading to the bedrooms that share the bathroom. However, the term “Hollywood bathroom” is now commonly used to refer to Jack and Jill bathrooms. This further blurs the distinction, treating the two bathroom types as mere varieties of the same design. Whatever you may want to call it, any homeowner needs to understand the functions and implications of such shared spaces. The true value of any shared bathroom configuration lies in how well it integrates with the residents’ daily life. Needless to say, let us now examine its practical considerations. What Are the Advantages and Disadvantages of a Jack and Jill Bathroom? Building a Jack and Jill bathroom into your Seattle home may sound like an attractive prospect. However, it’s worth considering the design’s benefits and drawbacks before you sit in front of the drawing board. Pros There are plenty of reasons why many Seattle homeowners love the Jack and Jill bathroom. These typically include the following: Cons However, Jack and Jill bathrooms also come with some disadvantages that might just make you think twice. The main problems people have with this type of bathroom include: What is the point of a Jack and Jill bathroom? Now, you may be asking, why would someone share a single bathroom with the person in the next room? For sure, the hygienic prospects of sharing the same space are less than ideal. The potential privacy issues should also be enough to turn some people off from the idea. However, the main point of a Jack and Jill bathroom is purely a matter of function and efficiency. Essentially, it combines two otherwise separate bathrooms into a single space, making it easier to build, upgrade, and maintain than two baths. It is practically a cost-efficient, space-saving, home improvement hack. In Summary A Jack and Jill bathroom certainly has compelling advantages along the lines of space optimization, cost-efficiency, and convenience. It’s crucial to weigh these benefits against the design’s natural limitations and potential privacy concerns. In the end, the decision to incorporate this type of bathroom into your Seattle home lies on your specific needs and priorities.
Bathroom remodeling is expensive. So, you might want to know how to get homeowners insurance to pay for bathroom remodel projects. However, the truth is that it is not designed to directly cover any renovation work. Now, what does this mean, and what are your alternatives? Does Homeowners Insurance Cover a Bathroom Remodel? A homeowners insurance does not usually cover the costs of any renovation work, including bathroom remodels. It is primarily designed to protect your finances should any unforeseen event cause damage to your home and property. More specifically, it covers the costs of restoring your home to its pre-damaged state. However, there may be exceptions where you can get your homeowners insurance to cover the renovation costs. This could be true in cases where the only way to repair the damage to your home caused by a covered event is a bathroom remodel. Here are some examples: Based on these examples, a remodel can only be covered by your homeowners insurance requires an unexpected event to cause significant damage to your bathroom. In other words, the remodel should not be deliberate. It has to be driven by the need to repair or rebuild your home after an unforeseen, destructive event. On the other hand, a planned bathroom remodel is not covered by your homeowners insurance. Instead, it will possibly increase your home’s rebuild value beyond what your insurance covers. The adjustment may involve the following factors: If your home’s rebuild value is higher than your insurance cover, you may need to increase your insurance coverage. This ensures that your entire property is protected adequately. For this, you may need to review and update your insurance policy. Note that you may need to pay higher premiums once your policy was updated to cover your remodel’s added rebuild value. How to Determine Rebuild Cost For Home Insurance? To understand the rebuild value of your home after your bathroom remodel, you will have to estimate the costs of rebuilding the entire house after a total loss. In case of a bathroom remodel, you only need to take the costs involved in this project into account. This includes the new materials used, the labor expenses involved, and the cost incurred by any upgrades done to the bathroom. Add your estimate to the previous rebuild value of your home minus that of your previous bathroom construction. If this sounds complicated, that’s because it is indeed complicated. Your best alternative to this DIY approach is to get professional valuation through a home survey performed by a qualified contractor. You can also use an online building replacement calculator, such as this one from Allianz. Note that your home’s rebuild value is different from its market value. We’ve already defined the former as the estimated cost of rebuilding your property following its complete destruction. Meanwhile, the latter is the estimated selling price of your home based on various factors, including the house’s condition, size, and proximity to local conveniences and services. The market value can be lower or higher than the property’s rebuild value and original purchase cost. Do I Need to Tell My Insurance Company About Renovations? Insurance companies usually require and encourage their clients to report any and all renovation projects, including bathroom remodels. It is in the best interest of the homeowner to do so, mainly for the following reasons: Increase in rebuild value Your bathroom remodel may inadvertently increase your home’s rebuild value. This increase may go above your insurance’s coverage. Reporting your renovation informs your insurance company of this change, allowing them to adjust your policy limits to maintain adequate protection in case of loss or damage due to a covered event. Potential change in risks Certain upgrades to your bathroom may change your home’s risk profile. This will either increase or decrease the likelihood and severity of certain claims. Possible policy violations Some insurance providers require homeowners to inform them of any renovation done to their property. Failing to do so constitutes a breach in the terms of your policy. This could lead to potential issues with your coverage or possible denial of future claims. Avoidance of future issues Being transparent with your insurance company gives them a clear understanding of any updates you’ve made to your property. This could help you avoid disputes when you need to file a claim. To Sum Up You can only get your homeowners insurance to pay for your bathroom remodel if renovation is the only way to restore your bathroom following substantial damage from an unforeseen, destructive event. The opposite is true for deliberately planned bathroom remodel projects. In both cases, the remodel could adjust your home’s rebuild value—a fact that you need to report to your insurance company for transparency and policy coverage adjustment.
Bathroom remodeling can be complex. You may not be able to do all the work on your own, especially since specialized tasks like plumbing require licenses and permits. Hiring a contractor would always be your most convenient option. Now, if you want to know how to hire a contractor for bathroom remodel projects, here’s what you should know. How to Hire Someone to Redo a Bathroom? Finding the best contractor to renovate your bathroom is no walk in the park. It’s not easy to choose one in a sea of builders, all of which claim to be the best at what they do. Of course, you can’t just trust their opinion, so here’s a handy step-by-step guide to hiring a bathroom remodel contractor: 1. Plan your bathroom remodel. Start by defining the requirements of your remodel. Set the scope of the renovation work as well as your expected results. Consider the changes that you want, the functionalities that you wish to add, and the issues that you need to resolve. You don’t need a comprehensive renovation plan at this stage, but having one helps. You should then be able to come up with a budget plan. This does not have to be very detailed; you only need to establish a working budget for your contractor. The initial budget should guide your contractor in suggesting solutions that align with your financial constraints. Be realistic in setting your estimates, considering the cost of materials, labor, and a contingency fund for potential unforeseen issues and emergency expenses. 2. Do research on local contractors. Use the Internet to quickly find bathroom remodeling contractors in your area. Look them up in search engines, online directories, and social networking sites. Alternatively, you can ask your friends, neighbors, or relatives for their recommendations. Checking the morning paper’s classified ads can be quite helpful, too. Take note of your prospects’ names and contact information, including their phone numbers and email addresses. Look up their websites and social media pages to get a glimpse of their work. See if the style and finish of at least one of their previous projects align with your vision, narrowing down your list in the process. 3. Check the credentials and quality of work. Take a look at the reviews and client testimonials in your candidate contractor’s website or social media page. This lets you gauge their professionalism, communication skills, and overall customer satisfaction. The feedback from their previous clients should reveal a pattern that tells you of the work ethic and reliability. You should also check if the contractor has the proper licenses and permits to operate in your area and perform the necessary tasks. First, review your state’s licensing and registration requirements. Next, contact the contractor and ask for their licensing information. Cross-check the information they provide with government records. State government websites usually have online search portals that lets you check for registered contractors’ licenses. See if the contractor’s license is still active, or if they’re licensed for the type of work required by your bathroom remodel. Note the address in their registration and compare it with the one they provided; a mismatch is usually a red flag for fraud and illegal operations. You should also look out for complaints and records of disciplinary actions against the contractor. 4. Discuss estimates, warranties, and project timelines. Once you’ve singled out the legitimate and reliable contractors from your list, ask these lucky candidates for their estimates for your planned remodel. Remember to present your budget plan so the contractor has an idea how much you’re willing to spend, what compromises should be made, and if your expectations work with your financial limitations. Don’t forget to talk about warranties as well. Reputable, experienced contractors take pride with the quality of their work and are happy to offer a refund for issues that may occur within a certain amount of time after the remodel’s completion. The lack of a warranty indicates low confidence and should be considered a dealbreaker. Once you’ve taken note of the estimates and warranties, ask each contractor for a realistic timeline to complete your bathroom remodel. Discuss the factors that may affect the project’s duration, including material availability and local bureaucratic requirements. It’s also important to get insights on their approach to the project and how they communicate with their clientele. From here, you can further thin your list. Note the contractors that can work within your financial constraints and are able to deliver at the best possible date. Don’t just go for the cheapest and fastest—the quality of the call and the contractor’s willingness to provide detailed explanations should be strong indicators of the caliber of service. 5. Select the contractor. Take time to review the top contenders for your bathroom remodel project. Compare the quality of their work and how well they can bring your vision to life given your limited budget. Again, don’t just settle for the cheapest offer. Choose the contractor with the highest potential to deliver based on their portfolio, reputation, and price that aligns with the value they provide. 6. Sign the contract. Before work starts on your bathroom remodel, you and your contractor should have a legal contract that clearly outlines all aspects of the project, including the scope of the work, payment schedules, and the professional services involved. Together with your contractor, review this thoroughly and make amendments, if necessary. Once you have come up with a contract that all parties can agree with, you may now sign the document and the renovation will begin. How Much Should It Cost to Renovate a Bathroom? Bathroom remodels cost around $12,000 on average across the United States. A low end makeover may be as cheap as $2,500, while top-of-the-line remodels can set you back by as much as $30,000. The actual cost depends on the size of the bathroom and the extent of the renovation. How Long Should It Take a Contractor to Remodel a Bathroom? A bathroom remodel in the hands of
Turning Your House Into a Home, One Project at a Time.
Stay Connected
Reviews
Newsletter