Bathroom tiles are a staple of interior design in Renton homes. However, the humid Pacific Northwest climate and the wear and tear of daily life can take a toll on your tiles. For bathroom tile repair Renton homeowners need to follow a strategic approach. In that regard, here are foolproof steps to restore your bathroom’s finish, or know when it’s time to call a pro.
How To Repair a Broken Bathroom Tile?
The amount of work needed to fix broken bathroom tiles depends on the extent of the damage to your tilework. Small cracks and dents may only need a few proven tricks to look good as new, while unsalvageable tiles will need complete replacement.
Minor cracks
Small but noticeable tile damage is not impossible to fix. Here’s what you can do about those annoying cracks:
- Clean the tile. Cleaning is the first step in addressing the issue. Remove all loose debris with a broom or vacuum cleaner, then wipe any stubborn dirt off the tile with a dry rag or tissue paper. There’s no need to extend the clean-up beyond the affected tile, since you’ll only have to deal with that specific piece.
- Mix and apply epoxy. You will need an epoxy putty that can work on constantly wet areas like the bathroom. This type of epoxy usually comes in two parts: the base component resin and the hardener that reacts with the resin to harden the mixture. Mix the two parts well until all distinct colors are unified into a homogeneous hue. Apply the resulting paste to the damaged area, and let it cure as directed in the package.
- Level the epoxy. Use fine-grit sandpaper to level the cured epoxy. For best results, buff the application by using progressively finer sandpaper, then finish with a damp cloth. The final product will be a dusty mess, so be sure to clean up with a vacuum cleaner, broom, or a wet rag before proceeding to the next step.
- Paint the crack (optional). You may also paint the crack to hide the damage. You may use epoxy, acrylic latex, or any tile-specific paint. The idea is to use paint that works with your tile’s surface and with the color that matches the rest of the slab.
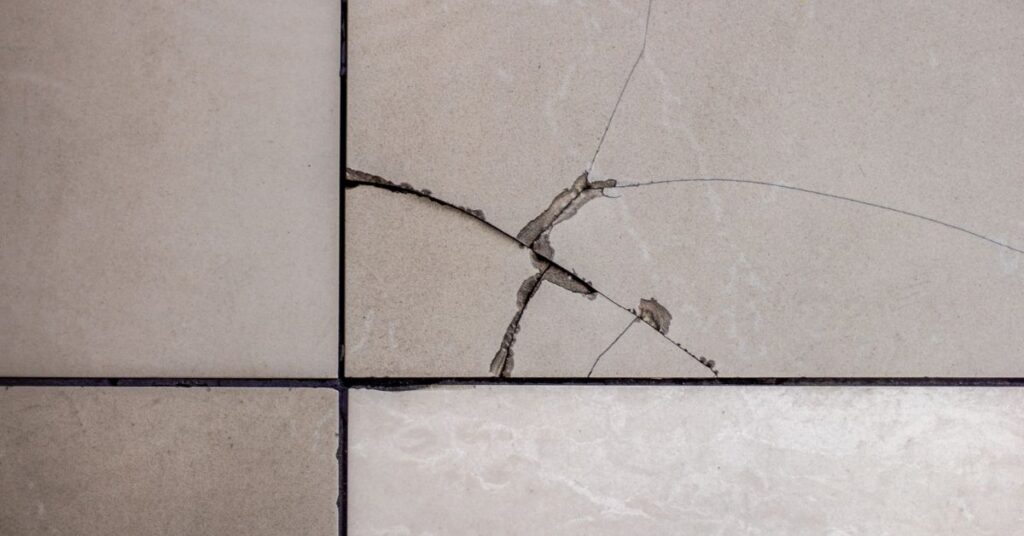
Large cracks or broken tiles

For tiles that are broken, shattered, or have large, unsightly cracks, complete replacement is a must. This will be quite tricky, as you will need to carefully extract the ruined tile while keeping the rest of the tilework intact. That said, here are the steps that you can follow to safely replace broken tiles:
- Put on protective equipment. For major tile repairs, the bare minimum equipment is gloves and eye protection. These will protect you from the fine dust and sharp shards that gets kicked up when you remove the damaged tile.
- Protect the surrounding, undamaged tiles. Ensure that you leave surrounding tiles intact by carefully removing the existing grout around the damaged tile. Use a grout saw or utility knife—or anything that can cut through grout without applying excessive force—to prevent the adjacent tiles from chipping upon their damaged neighbor’s removal. For additional protection, you may frame the surrounding tiles with painter’s tape and leave only the broken tile exposed.
- Remove the damaged tile. You will have to break the damaged tile to facilitate the removal. Start by drilling a hole through the center and then, using a hammer and chisel, break the tile from the center to the edges. Take care not to hit the adjacent tiles.
- Chisel the surface below the tile clean. Removing the broken tile exposes the hardened tile adhesive. You will need to remove this with a chisel to reveal the level underlayer. Remove the larger debris by hand, and use a vacuum cleaner to take out the dust and smaller debris.
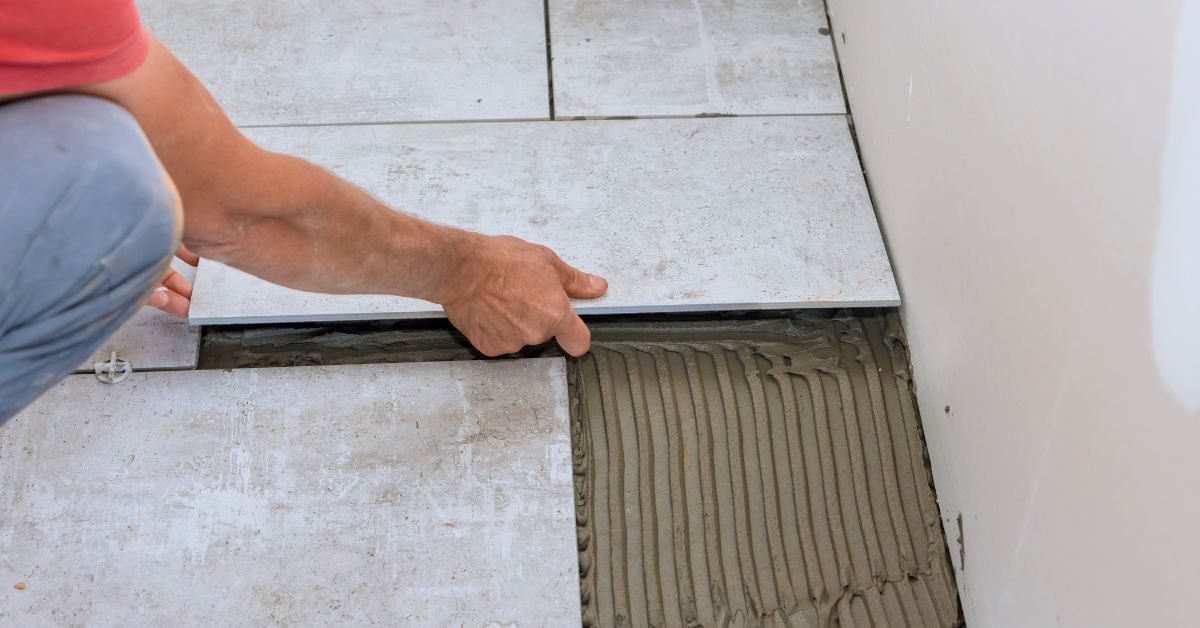
- Apply new tile adhesive. Prepare thinset mortar and follow the manufacturer’s instructions to mix the tile adhesive. Use the flat side of a notched trowel to apply a liberal amount of the paste to the exposed area. Using the notched edge, create straight, parallel lines on the adhesive. These ridges prevent the formation of air pockets under the tile by forcing the air through the channels and out by the tile’s edge.
- Set the new tile. Back-butter your new tile by adding a thin layer of adhesive on the underside. Then, gently place the tile on the gap, carefully aligning it with the other tiles. Apply even pressure to the tile to collapse the grooves in the underlying adhesive and ensure complete coverage. Use a straight edge or level to check if the tile is flush with the surrounding tilework. You may need to press the new tile down further or remove some adhesive if it’s too high, or add more mortar if it’s too low.
- Let the new tile cure. Place spacers around the new tile to maintain a uniform gap. With everything in place, wait about 24 hours—or the manufacturer’s recommended drying time—for the tile and adhesive to cure.
- Apply grout and clean the excess. Once the new tile has set, remove the spacers and start mixing your grout according to manufacturer instructions. Use a rubber grout float to take pick up some grout and force it into the gap around the newly placed tile. Scrape off any excess grout using the rubber float. Use a grout sponge to clean the remaining grout and smoothen the joint lines.
- Let the tile cure for the last time. Leave the tile for at least 72 hours, letting the grout set and the tile to cure further. After the grout has cured, apply a grout sealer as protection against moisture and staining.
When to Call a Professional

While it’s cheaper and quite feasible to do the tile repair on your own, there are times when you’re better off hiring a bathroom remodel contractor for the job. The following situations would call for specialist help:
- Water issues. The presence of moisture under the tile can cause more problems than tile damage. It’s also an indication that there may be issues with the plumbing or water sources, and this calls for the help of a licensed plumber.
- Large-scale damage. Tile damage across large sections of your bathroom floor is best entrusted to an experienced bathroom remodeler. They know how to effectively replace multiple damaged tiles, fixing any underlying issues as they go.
- Complete tile replacement. Significant damage to your bathroom floor may require a complete bathroom floor remodel. This is yet another job best left to professionals, who are well-equipped with the tools, experience, and precision needed to give your bathroom floor that much-needed rework.
Bathroom Tile Repair Renton Rates
For bathroom tile repair Renton homeowners may need to shell out an amount between $100 to $500. Again, this completely depends on the amount of work involved, part of which translates to the price of the material needed to complete the repair.
Working with a contractor will naturally put your expenses at the higher end of the scale. However, this is the wiser investment compared to doing the job yourself. DIY work is prone to errors, especially in the absence of experience and when it comes to repairing significant tile damage.
Wrapping Up
The type of bathroom tile repair Renton residents can handle on their own involves no more than small cracks or a few broken tiles. When it comes to larger-scale repairs, it may be best to hire a bathroom remodel contractor. There’s nothing wrong with bringing in the pros when the job’s a little too much work.